
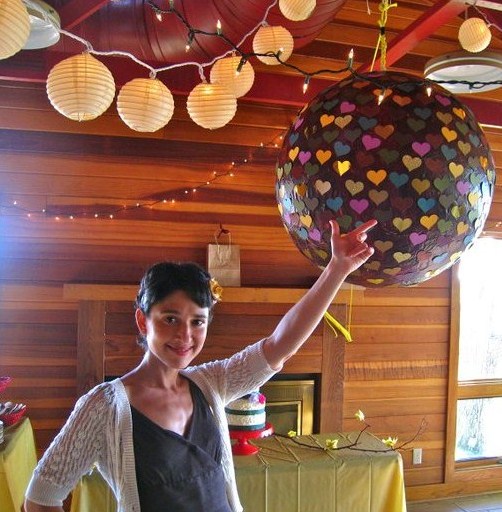
Who doesn’t like to see their party guests blindfolded, wildly swinging a stick at a stuffed object in the hopes of being showered with candy? I have never been to a party where a piñata was not a great success, and lately I find myself using any excuse to make one..
 The piñata may have originated in China in the 14th Century, where farmers are believed to have broken open paper-covered animal figures in the hopes of ensuring a fruitful harvest. The piñata has been adopted by many cultures and used for numerous purposes since then. For example, the classic seven-coned sphere piñata you see today was originally used as a tool by Spanish missionaries who came to America to convert the native people. The attractive, colorful piñata represented Satan and the seven cones represent the seven deadly sins. The rewards for destroying evil were the goodies inside!

The piñatas I have ma de in the past have been motivated purely by fun, and the shape they end up taking has been determined by the specific occasion. Examples amongst these are: a larger than life cardboard flute piñata for my flutist sister’s bridal shower (she didn’t even know what she was trying to destroy) and a giant seagull for a lawyer/playwrite friend’s going away party (there was a reading being given with a seagull theme).
I had visions of creating my most elaborate piñata to date for my DIY wedding, but as the date grew closer and the list of things to do multiplied exponentially, I had to reassess my priorities. In the end, my goal was to make something big, bold, and as easy as possible...something that could function as a disco ball yet still look visually appealing behind the newlywed table.
I made a piñata so simple that the even the most craft-fearing among us could create it! All you need is a week’s time to let your layers dry properly, and the following materials:
Materials
~One big inflated yoga/exercise ball
~A large bowl for the ball to sit in as you apply the newspaper layers
~3 16 oz bottles of Elmer’s Glue-All
~Newspaper
~A container to mix your glue/water mixture in (empty yogurt containers work well)
~Thick cotton or nylon rope
~Duct tape
~Acrylic paint and a paint brush
~Metallic and colored paper or cardstock to make hearts (I used sheets of cardstock from the scrap booking section of the craft store)
~Scissors to cut your hearts out with, or a heart-shaped punch if you are really pressed for time
~Candy, and other fun party stuff. (Bagged gourmet popcorn is great because it is lightweight)
Note: If you are making a heavy piñata you may need additional supplies to make an internal support, such as hard foam, a bread knife, cardboard, and a hot glue gun. Small, light pinatas can simply be hung by poking four holes in the top, and creating two hanging loops with twine... but this is a BIG piñata! If you are going to fill a piñata this size with lots of goodies, and you are petrified of it falling down and breaking someone’s neck (thus turning your fun party into a tragedy) you may want to make a special internal support for it. I made one out of foam and board (described later) but there are numerous ways it can be done.
The steps!
1. Put your yoga ball in your large bowl so it won’t roll away.
2. Pour some of the glue into your container. Dilute it just a bit with water until is is about 8 parts glue to 1 part water. Stir.
3. Tear your newspaper into long strips about 1-1.5” wide. Dunk them into your glue mixture. Gently wring them out so they are saturated with the glue mixture but not dripping.
4. Start applying your strips to the yoga ball, placing them so that one overlaps the next slightly. Make sure you do not cover the area around the yoga ball air plug! You will need to leave this uncovered so you can later deflate your ball and remove it in one reusable piece (so you can make more huge piñatas, of course). When the entire surface has been covered with newspaper, let it  dry for several hours or overnight. Then put on your second layer of newspaper strips. I positioned my second layer of strips perpendicular to my first layer, to help me keep track of what I had already gone over (see image below, at right) Repeat this process until you have covered your ball with about five layers of newspaper. Let each layer dry first before putting the next one on. To make your life easier, let each layer dry
  overnight.
Once your pinata has five dry layers of glue –covered newspaper on it, it is time to pull the plug on ball! You will hear a thrilling noise as the air rushes out of the yoga ball and it shrivels up into a deflated mass at the bottom of the large hollow newspaper ball you have created!
5. The next step is to cut a trap door into what will be the side of the piñata with your scissors, starting where the air hole was. Make it big enough so you will be able to reach in to remove your deflated yoga ball
  (Mine was big enough that my cats could fit inside) The trap door area is the “weak spot” of your piñata, which you do not want to be at the top or at the bottom where the stress from the weight of the candy is. The side is best—and someone might be lucky enough to hit it!
 6. Now, stuff that pinata with goodies!!! Keep in mind that light-weight things are best for a piñata of this size made of 5 layers of newspaper. It is best not to put breakable candies in there or glass bottles of booze unless the piñata will be broken above a carpet. I filled mine with bags of popcorn, bite-sized candy bars, fake plastic glasses with attached noses, topographic magnets I made for wedding favors, personalized mechanical pencils, fruit bars, gum, etc, etc.
7. Figure out how you’ll hang your piñata safely. No matter what method you use, you should first reinforce the top interior of the pinata with duct tape to prevent tearing. If the contents of your piñata are lightweight, you can just poke four holes through the top (at a distance of about 2” apart) and run some cotton or nylon rope through these holes to creat e two loops, which the hanging rope can be tied to.
If your piñata contents are heavy, and/or you are a worrier like me, you can create a support like the one shown in the picture, at left. Here I have cut a piece of hard foam into a slight dome shape to go inside the top of the piñata so the stress on piñata as it hangs will be distributed over a large surface area. I hot-glued some card
 board to the bottom of the foam and then cut a hole out of the center of the foam and the cardboard. Next I ran a piece of nylon rope through the foam and cardboard, positioning it so that a loop of rope stuck out the top. There’s my friend Victoria masterfully tying the bottom of the rope around a stick at the bottom of the support, so that when the piñata is hanging, the nylon rope won’t slip up through foam dome, out the top of the piñata. And there is a picture of me, obsessively stress-testing the support. Next I simply slid the loop at the top of the support through a hole I had poked in the top of the pinata after reinforcing the interior with duct tape. I am sure there are hundreds of easier methods to safely hanging your pinata, but we couldn't think of a better one late that night. (Yes, these pictures were taken the night before the wedding.)
 7. Make sure your hanging mechanism is in place, because the next step is to seal up your trap door with with a few pieces of gluey newspaper or tape, which you can paint over later. (You will notice in my pictures that I sealed my trap door up with duct tape after I painted it---this is because I didn’t have all the goodies gathered yet until the last minute)
8. Paint that piñata with a couple layers of acrylic paint. You could prime it with gesso first to make the surface nicer, but I was REALLY pressed for time so skipped this step, knowing that my paper hearts would cover the areas where you could faintly see the newspaper ads.
 9. If you are making a heart-covered disco ball piñata like mine, cut up your paper hearts, or use a heart punch to punch your card stock in a very fast and efficient way.
10. Glue those paper hearts to your piñata! Remember to cover the bottom well which is the part that will be most on view once it is hanging.
Now--- your piñata is ready to meet its fate at your party……don’t forget the hanging rope, broomstick, and blindfold!
We hung my piñata from the rafters above the "dance floor" in the lodge where we held our wedding reception. Many a picture was taken in front of this piñata...and some dancing was done….but I will skip to the best part—its destruction!

The destruction of the disco ball piñata
When the time came we pulled back the hanging party lights and lowered the piñata to make it easier for the kids to hit (my Dad had cleverly tied the end of the hanging rope around a hook on the side of the fireplace, making it possible to raise and lower it as needed). We started with the little kids, giving them each 3 turns with a plastic broomstick we found in the lodge(blindfold optional).

A medium-sized kid, my new nephew-in-law, ended up somehow breaking the broomstick in half while hitting the piñata …but the piñata remained intact! I secretly worried I had made the piñata too hard to break open, which I have mistakenly done in the past! (In those cases we ended up playing kickball with it outside)

After the kids, it was my turn. I put on the blindfold and walloped the piñata three times…I could feel the impact of broomstick against layers of glue-hardened paper, and I could hear the cheers, but heard no sound of candy hitting the floor!


Then my brand new husband took the (half)broomstick……………And by his immense power and/or the fact that he hit the weak spot, he DESTROYED IT!!!!!!!!!!


The destruction of my disco ball piñata was the perfect end to a perfect day!

Special thanks to my friend, co-worker, and fellow OCM member Megan for finishing gluing the hearts on the piñata the day of the wedding as I scrambled to make a bouquet before the photographer arrived. And special thanks to my friend Trilety for punching out hundreds and hundreds of hearts using her iron grip!


